DN42, aka Decentralized Network 42, is a large VPN network. Unlike traditional VPNs, DN42 uses a lot of technology involved in Internet backbones (such as BGP) and is a great simulation of a realistic network environment.
In a previous post, I joined DN42 and connected most of my VPSes to it. (The ones left are OpenVZ VPSes without Tun/Tap support.) I knew from the beginning that DN42 has its own domain name system. For example, DN42's wiki (https://wiki.dn42.us/Home) can be accessed as https://internal.dn42 in DN42. I didn't register a domain back then since I didn't have time, and I didn't have much knowledge of DN42. I finished the registration this month and would like to share my experience.
Building Authoritative DNS
An authoritative DNS is responsible for a domain's records. For example, the
domain for this blog, lantian.pub, has authoritative servers
lv3ns[1-4].ffdns.net from CloudXNS. While registering domains on the Internet,
we can use existing free DNS services, such as Cloudflare or CloudXNS. But in
DN42, although there were people providing such services, communication over IRC
is usually required. I found it not worth the hassle and decided to self-host
one.
Bind or PowerDNS is usually used when setting up an authoritative DNS server on Linux. Bind stores DNS records as files, which are a bit hard to manage when synchronization across servers is needed. For PowerDNS though, in addition to files, the records can also be stored in a database like MySQL. By the way, PowerDNS also provides its own synchronization mechanisms.
Since I never succeeded in setting up PowerDNS's native sync, and I haven't figured out why, I simply set up a MySQL source/replica replication.
The server serving "standard" data is called "Primary DNS server / MySQL replication source", and other servers synchronizing from it are called "Secondary DNS server / MySQL replica".
Setting up DNS: MySQL Master/Slave Sync
First, install a MySQL in each server, and add these lines to my.cnf:
# Server IDs, can be assigned to anything, but must be unique
server-id=1
# Server names, will be shown in phpMyAdmin's sync status page
report-host=Master
# MySQL binary log files, core files for replication
log_bin=mysql-bin
log_error=mysql-bin.err
Then login to the source MySQL server with phpMyAdmin, and set the server to
source (master) on the "Replication" page, and create a user for replication
(with permissions of REPLICATION SLAVE and REPLICATION CLIENT).
When you've finished the setup, you should see a similar status as:

The "File" is the filename for the MySQL binary log, and "Position" is the current line position. Record these two values.
Then, shut down MySQL on all servers. Use rsync or similar tools to copy the
database to replica servers, replacing the data directories. Then restart all
MySQL services. If you don't have much database writes, like for a personal
blog, you may try to do this without shutting down the source server, but keep
in mind that in this case, the copied data may be corrupted.
Then use phpMyAdmin to log on to replica MySQL servers. Since I met a strange problem while setting up a replica with its wizards, I'm executing an SQL instead:
change master to master_host='[Source Server IP]',
master_user='[Replication Username]',
master_password='[Replication Password]',
master_log_file='[Binary Log Filename]',
master_log_pos=[Binary Log Position];
start slave;
Then go to the "Replication" page, click "See slave status table", and confirm
that Slave_IO_Running and Slave_SQL_Running are both Yes. Now the
replication is up and running.

Setting up DNS: Configuring PowerDNS
After done with the database, we can set up PowerDNS. First, create a user and database in MySQL for PowerDNS.
Then, install PowerDNS. Since I'm a Docker user, I simply downloaded and started
a container with docker-compose:
powerdns:
  image: psitrax/powerdns
  container_name: powerdns
  restart: always
  entrypoint: '/entrypoint.sh --cache-ttl=120 --master=yes --slave=yes'
  environment:
    - MYSQL_HOST=[Database IP]
    - MYSQL_USER=[Database Username]
    - MYSQL_PASS=[Database Password]
    - MYSQL_DB=[Database Name]
  ports:
    - '[DN42 IP]:53:53'
    - '[DN42 IP]:53:53/udp'
Here PowerDNS may fail to start, telling you that some columns are too long when
creating the comments table. This is because of a configuration change with
MySQL, causing a behavior change. These columns may be up to 64000 bytes long,
which won't fit in the data table.
Instead of changing the database config, we can simply reduce the length from 64000 to 16000, for example, and manually create the tables:
This schema may be out of date for newer PowerDNS. See https://doc.powerdns.com/authoritative/backends/generic-mysql.html for the latest schema, and change length accordingly.
CREATE TABLE domains (
  id                    INT AUTO_INCREMENT,
  name                  VARCHAR(255) NOT NULL,
  master                VARCHAR(128) DEFAULT NULL,
  last_check            INT DEFAULT NULL,
  type                  VARCHAR(6) NOT NULL,
  notified_serial       INT DEFAULT NULL,
  account               VARCHAR(40) DEFAULT NULL,
  PRIMARY KEY (id)
) Engine=InnoDB;

CREATE UNIQUE INDEX name_index ON domains(name);

CREATE TABLE records (
  id                    INT AUTO_INCREMENT,
  domain_id             INT DEFAULT NULL,
  name                  VARCHAR(255) DEFAULT NULL,
  type                  VARCHAR(10) DEFAULT NULL,
  content               VARCHAR(16000) DEFAULT NULL,
  ttl                   INT DEFAULT NULL,
  prio                  INT DEFAULT NULL,
  change_date           INT DEFAULT NULL,
  disabled              TINYINT(1) DEFAULT 0,
  ordername             VARCHAR(255) BINARY DEFAULT NULL,
  auth                  TINYINT(1) DEFAULT 1,
  PRIMARY KEY (id)
) Engine=InnoDB;

CREATE INDEX nametype_index ON records(name,type);
CREATE INDEX domain_id ON records(domain_id);
CREATE INDEX recordorder ON records (domain_id, ordername);

CREATE TABLE supermasters (
  ip                    VARCHAR(64) NOT NULL,
  nameserver            VARCHAR(255) NOT NULL,
  account               VARCHAR(40) NOT NULL,
  PRIMARY KEY (ip, nameserver)
) Engine=InnoDB;

CREATE TABLE comments (
  id                    INT AUTO_INCREMENT,
  domain_id             INT NOT NULL,
  name                  VARCHAR(255) NOT NULL,
  type                  VARCHAR(10) NOT NULL,
  modified_at           INT NOT NULL,
  account               VARCHAR(40) NOT NULL,
  comment               VARCHAR(16000) NOT NULL,
  PRIMARY KEY (id)
) Engine=InnoDB;

CREATE INDEX comments_domain_id_idx ON comments (domain_id);
CREATE INDEX comments_name_type_idx ON comments (name, type);
CREATE INDEX comments_order_idx ON comments (domain_id, modified_at);

CREATE TABLE domainmetadata (
  id                    INT AUTO_INCREMENT,
  domain_id             INT NOT NULL,
  kind                  VARCHAR(32),
  content               TEXT,
  PRIMARY KEY (id)
) Engine=InnoDB;

CREATE INDEX domainmetadata_idx ON domainmetadata (domain_id, kind);

CREATE TABLE cryptokeys (
  id                    INT AUTO_INCREMENT,
  domain_id             INT NOT NULL,
  flags                 INT NOT NULL,
  active                BOOL,
  content               TEXT,
  PRIMARY KEY(id)
) Engine=InnoDB;

CREATE INDEX domainidindex ON cryptokeys(domain_id);

CREATE TABLE tsigkeys (
  id                    INT AUTO_INCREMENT,
  name                  VARCHAR(255),
  algorithm             VARCHAR(50),
  secret                VARCHAR(255),
  PRIMARY KEY (id)
) Engine=InnoDB;

CREATE UNIQUE INDEX namealgoindex ON tsigkeys(name, algorithm);
Now PowerDNS will start successfully, but right now it isn't serving any records.
Setting up DNS: Installing PowerAdmin
PowerAdmin is a control panel for PowerDNS, which can be obtained from https://github.com/poweradmin/poweradmin. Simply follow its installation wizard.
Log in to the main menu after installation:

Click "Add Master Zone", where you need to add your domains. Enter your domain in the "Zone Name" box, and submit.
Back to the main menu, click on "List Zones", followed by the edit button to the
left of each domain, to enter this interface. Here I'll take lantian.dn42, my
DN42 domain, for example:
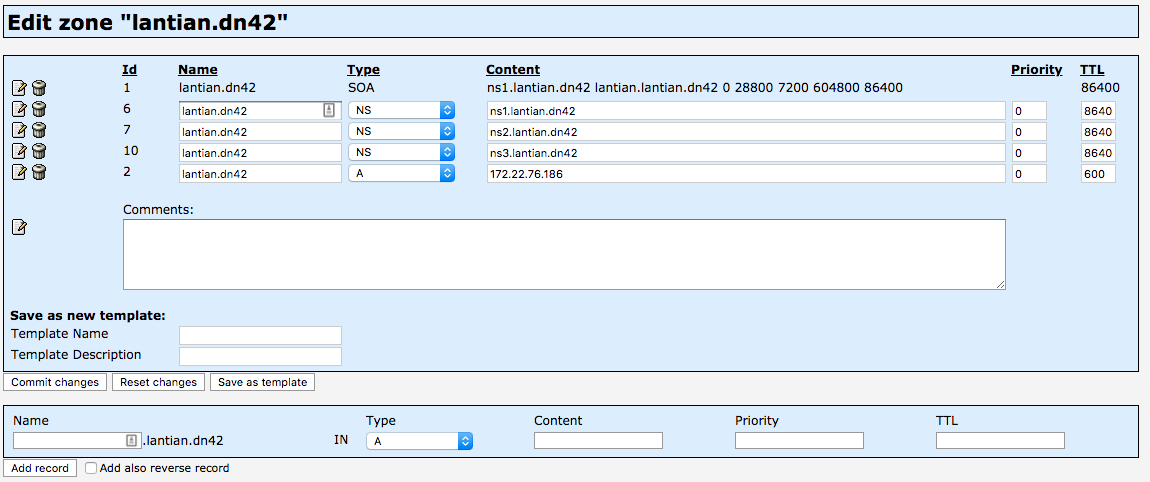
Initially, after installing PowerAdmin, the SOA record will not contain a
similar record as ns1.lantian.dn42, which doesn't fit with DN42's recommended
practices. I set my SOA record to "ns1.lantian.dn42 lantian.lantian.dn42 0 28800
7200 604800 60", and a detailed explanation of each field is:
ns1.lantian.dn42: Name of the main DNS server, usually the domain name of the server you're operating on.lantian.lantian.dn42: Mailbox of the DNS server administrator, with@at symbol replaced with.dot symbol. Here this value implieslantian@lantian.dn42. This doesn't have to be a real address in DN42.0: Record version ID, used to determine if records are changed if AXFR is used. Since we use MySQL replication, this is not that important. Set to 0 tells PowerDNS to manage it automatically without manual intervention.28800: Refresh time, the interval for the secondary DNS server to pull from the primary server with AXFR. Not important here.7200: Retry time, time to wait if a previous AXFR attempt failed. Also not important here.604800: Expiration time, time for a secondary DNS server to serve records since the last successful AXFR. After this period of time, the secondary DNS server will stop serving this zone. Also not important here.60: Minimal TTL for all records. Minimum time to refresh record data.
Click on the edit button to the left of SOA record, set the values, and save.
Then we need to set NS records, specifying that your domain will be served by
these DNS servers. I will configure 3 servers, ns[1-3].lantian.dn42. An NS
record is necessary for each of them:

Submit each one.
Finally, set the A records, to specify that the domain points to a specific server:

Now the primary PowerDNS has been set up. With MySQL replication in place, your configuration has been synced to other servers. Simply install PowerDNS on each of them.
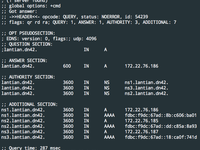
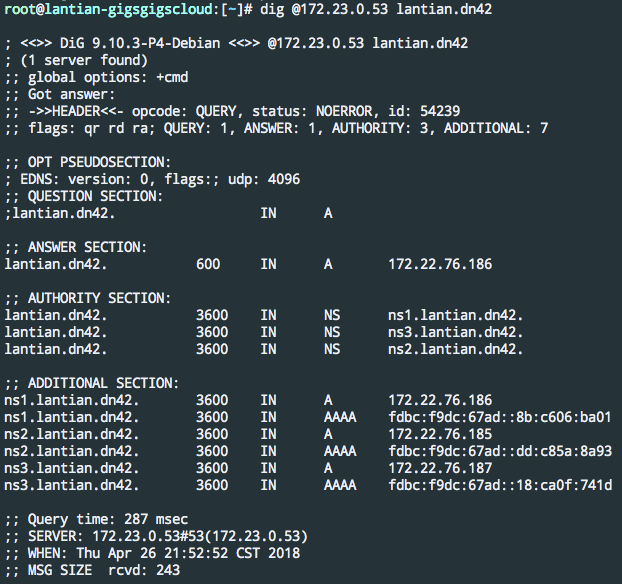
Finally, dig your own server as a test:
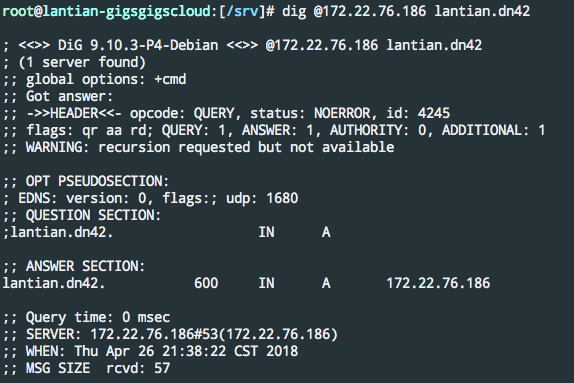
Register Domain at DN42
DN42 had an upgrade recently, replacing the old Monotone repository with Git. First, register an account at https://git.dn42.us/explore/repos, Fork dn42/registry, and Clone it to your local computer.
First, DN42 requires Git Commits to be GPG signed. I'm using GPG Keychain on Mac. The procedures are: creating a key, uploading pubkey to a public GPG server such as SKS, and copy the Fingerprint.
Then configure git so it will automatically sign each commit:
git config --global user.signingKey [Your Fingerprint]
git config --global commit.gpgSign true
Since I'm already a DN42 user and have my own MNT handles, I need to edit
data/mntner/LANTIAN-MNT and add my GPG fingerprint to it:
mntner:             LANTIAN-MNT
admin-c:            LANTIAN-DN42
tech-c:             LANTIAN-DN42
mnt-by:             LANTIAN-MNT
source:             DN42
auth:               pgp-fingerprint 23067C13B6AEBDD7C0BB567327F31700E751EC22
Then create data/dns/lantian.dn42:
domain:             lantian.dn42
admin-c:            LANTIAN-DN42
tech-c:             LANTIAN-DN42
mnt-by:             LANTIAN-MNT
nserver:            ns1.lantian.dn42 172.22.76.186
nserver:            ns1.lantian.dn42 fdbc:f9dc:67ad::8b:c606:ba01
nserver:            ns2.lantian.dn42 172.22.76.185
nserver:            ns2.lantian.dn42 fdbc:f9dc:67ad::dd:c85a:8a93
nserver:            ns3.lantian.dn42 172.22.76.187
nserver:            ns3.lantian.dn42 fdbc:f9dc:67ad::18:ca0f:741d
source:             DN42
(2020-03-22 Update: originally this line was also present:
status: CONNECTBut it was removed in an update in Nov 2018.
I made this update since one user in Telegram Group had problems with this.)
Then git add, git commit, git push, send a Pull Request and wait for
merging, and fix for any possible errors as admins request.
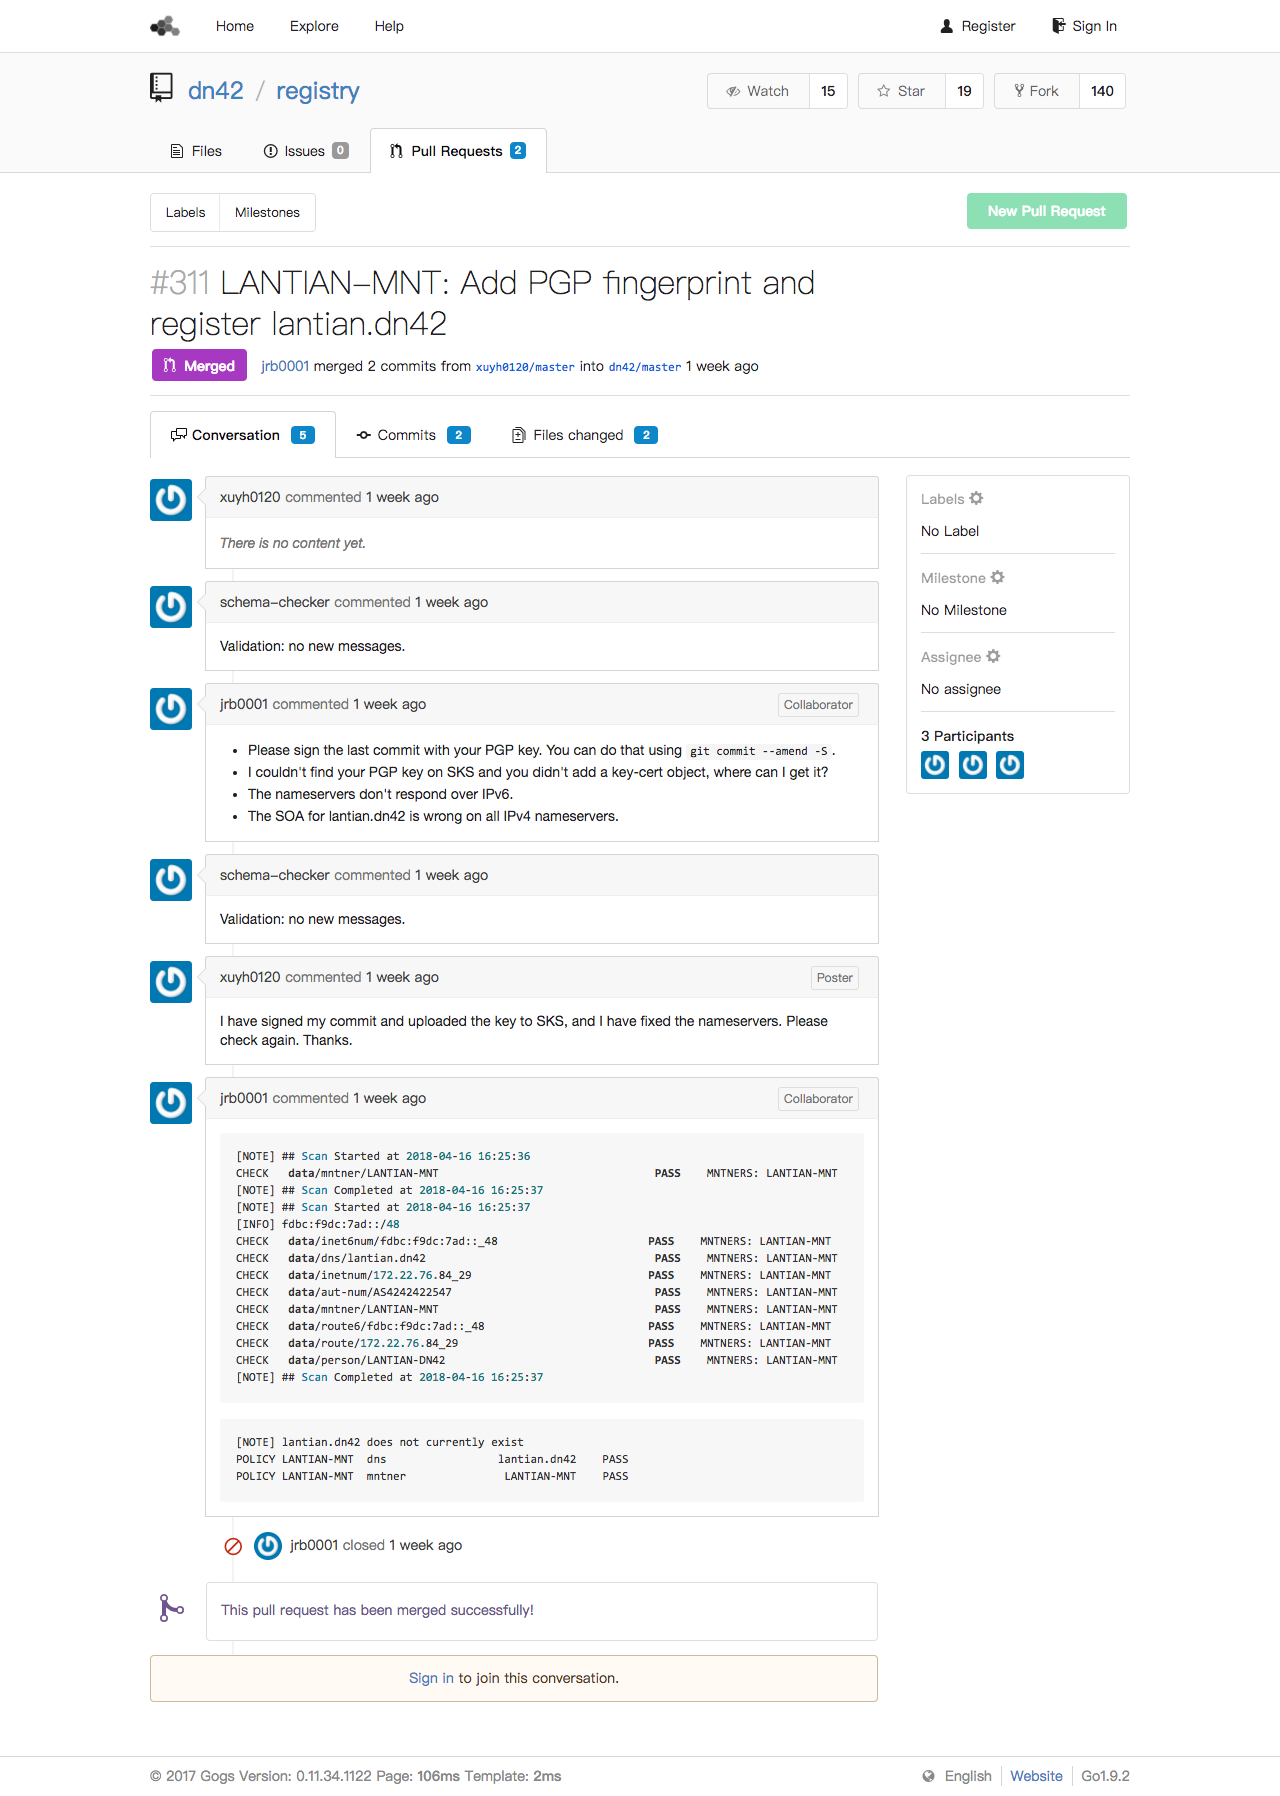
Since DN42 uses Anycast DNS, anyone can host a DNS recursive server. With different people polling updates from the central registry at different intervals, it may take up to a week for your domain to fully work.
Finally, we've registered a domain in DN42. Now you can set up your website, mail, IRC, game server, or whatever you want.