List of Lan Tian Mobile (LTE at Home) series posts:
In my previous post, I built a legal LTE network using the US CBRS band and Magma LTE core network software.
Regarding "legal": I am not a lawyer or a wireless expert. Based on my research into the relevant policies and regulations, my entire setup should be legal. However, I take no responsibility if you encounter any legal issues after following the instructions in this post.
I chose Magma at the time because the CBRS LTE base station I bought was originally used for the Helium Mobile network, and Nova Labs/Helium Mobile uses Magma for its CBRS core network. This ensured that Magma was compatible with my base station. However, from the perspective of building a self-hosted core network in a Homelab, Magma has these issues:
- Magma's core network relies on Docker or Kubernetes for deployment, making it difficult to deploy outside of containers using conventional methods (e.g., systemd services). As a NixOS user, I prefer to avoid bloated Docker containers and manage services on the system using systemd.
- Magma's Access Gateway can only be installed on Ubuntu 20.04, which has a completely different system management approach from my usual NixOS. This means I would need to manually manage the Access Gateway machine's configuration and system upgrades, without being able to reuse my existing NixOS configuration.
- Magma sometimes has strange issues, such as:
- Android phones always failing to connect to the base station while iPhones work fine;
- Phones unable to properly obtain the network name, always displaying MCC/MNC
315 010instead of the actual configured network nameLan Tian Mobile; - The Access Gateway connected to the core network and synchronized configurations normally, but the core network management interface showed that the Access Gateway had not been connected for a long time.
Therefore, after finishing the previous post and confirming the feasibility of building a self-hosted LTE network, I began trying to replace Magma with another open-source LTE core network software, Open5GS.
Compared to Magma, Open5GS has these advantages:
- Open5GS does not distinguish between core network and Access Gateway components; it can be fully deployed on a single machine.
- Open5GS packages are already available in Nixpkgs (
pkgs.open5gs), so I can install and use it directly on NixOS without needing to package it myself, and without Docker or Ubuntu. - Open5GS does not have the strange issues that Magma has; once set up, it is quite stable.
This post documents the process of setting up a core network with Open5GS on NixOS, and connecting a FreedomFi/Sercomm SCE4255W base station to the core network to transmit LTE signals.
Installing Open5GS
I referenced the following materials during the configuration process:
- Open5GS official documentation
- A set of Open5GS (and some add-ons) configurations packaged as ready-to-use Docker containers: herlesupreeth/docker_open5gs
Preparation
This post assumes you have prepared the following hardware or software configurations as described in my previous post. If you have not completed these configurations, you can refer to the corresponding sections in the previous post to configure the software or purchase the hardware:
- A FreedomFi/Sercomm SCE4255W base station with the web management interface unlocked.
- The base station is already registered with the CBRS SAS.
- A SIM card programmedwith authentication information (KI, OPC, etc.), and you have recorded this authentication information (for later registration with Open5GS).
This post will use NixOS for all configurations, but I also provides some commands for Ubuntu, which users of other Linux distributions can use as a reference.
Understanding Open5GS Components
Open5GS, as its name suggests, is primarily a software that implements a 5G core network (as well as a LTE core network). Since the core network protocols and structure in the 5G era are significantly different from the 4G era, especially for standalone 5G SA networks, Open5GS can roughly be seen as a set of LTE/5G NSA core network software, plus a set of 5G SA core network software, with a small portion of components shared between them.
The LTE/5G NSA part of Open5GS consists of the following components:
- MME - Mobility Management Entity
- HSS - Home Subscriber Server
- PCRF - Policy and Charging Rules Function
- SGWC - Serving Gateway Control Plane
- SGWU - Serving Gateway User Plane
- SMF - Session Management Function
- SMF itself is a 5G core network component, but Open5GS SMF also implements the Packet Gateway Control Plane in the 4G core network structure.
- UPF - User Plane Function
- UPF itself is a 5G core network component, but Open5GS UPF also implements the Packet Gateway User Plane in the 4G core network structure.
- SCP -
Secure, Contain, ProtectService Communication Proxy- SCP itself is a 5G core network component, but SMF depends on it.
- NRF - NF Repository Function
- NRF itself is a 5G core network component, but SCP depends on it.
And the 5G SA part consists of the following components:
- NRF - NF Repository Function
- SCP - Service Communication Proxy
- SEPP - Security Edge Protection Proxy
- AMF - Access and Mobility Management Function
- SMF - Session Management Function
- UPF - User Plane Function
- AUSF - Authentication Server Function
- UDM - Unified Data Management
- UDR - Unified Data Repository
- PCF - Policy and Charging Function
- NSSF - Network Slice Selection Function
- BSF - Binding Support Function
These components communicate with each other in the following structure:
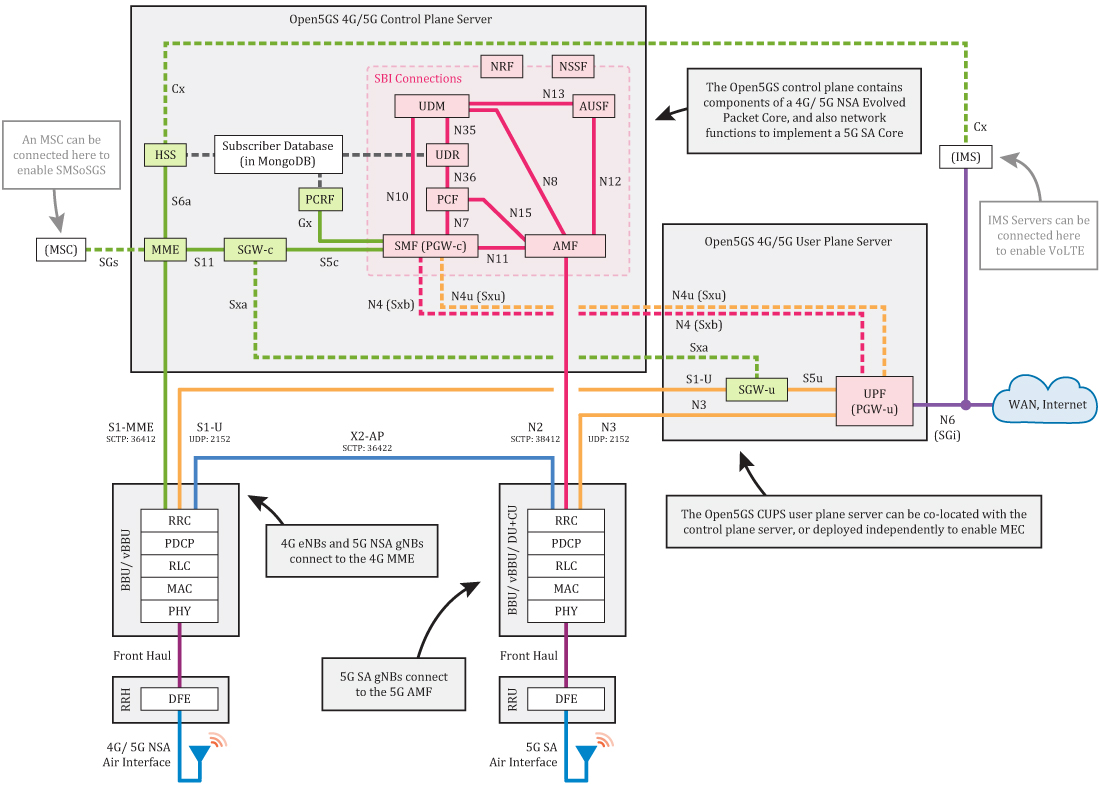
(Image source: Open5GS official documentation)
The communication between various components of the 4G/5G core network uses the standardized Diameter protocol, which is based on TCP or SCTP protocol, exchanging data between various components of the 4G/5G core network. This also means that hardware and software from different vendors, as long as they support the Diameter protocol, can join the same core network and jointly provide services to mobile users.
However, in this post, I will only use Open5GS components, and will not add other components to the core network for now.
Installing Open5GS Package
If you are using Ubuntu, you can refer to the Open5GS official installation tutorial:
# Install MongoDB
curl -fsSL https://pgp.mongodb.com/server-8.0.asc | sudo gpg -o /usr/share/keyrings/mongodb-server-8.0.gpg --dearmor
echo "deb [ arch=amd64,arm64 signed-by=/usr/share/keyrings/mongodb-server-8.0.gpg] https://repo.mongodb.org/apt/ubuntu jammy/mongodb-org/8.0 multiverse" | sudo tee /etc/apt/sources.list.d/mongodb-org-8.0.list
sudo apt update
sudo apt install mongodb-org

# Install Open5GS
sudo add-apt-repository ppa:open5gs/latest
sudo apt update
sudo apt install open5gs
During this process, in addition to installing the Open5GS binaries, a set of systemd services corresponding to each Open5GS component is created, and the default Open5GS configuration is copied to /etc.
Since NixOS only has the Open5GS package (pkgs.open5gs) and no corresponding NixOS module, we need to manually create systemd services for Open5GS, mimicking the installation process on other systems like Ubuntu:
{ pkgs, lib, ... }:
let
  # Since we are only building a 4G core network, only enable the services required for 4G core network
  services = [
    "hss"
    "mme"
    "nrf"
    "pcrf"
    "scp"
    "sgwc"
    "sgwu"
    "smf"
    "upf"
  ];
in
{
  # Enable MongoDB, HSS, PCF, PCRF components need MongoDB to save configurations
  services.mongodb = {
    enable = true;
    bind_ip = "127.0.0.1";
    package = pkgs.mongodb-ce;
  };

  # Create systemd services for each Open5GS component
  systemd.services = builtins.listToAttrs (
    builtins.map (svc: {
      name = "open5gs-${svc}d";
      value = {
        description = "Open5GS ${lib.toUpper svc} Daemon";
        wantedBy = [ "multi-user.target" ];
        after = [
          "network.target"
          "mongodb.service"
        ];
        requires = [
          "network.target"
          "mongodb.service"
        ];
        serviceConfig = {
          # The configuration file in the open5gs folder pointed to here will be created in the next step
          ExecStart = "${pkgs.open5gs}/bin/open5gs-${svc}d -c ${./open5gs}/${svc}.yaml";
          ExecReload = "${pkgs.coreutils}/bin/kill -HUP $MAINPID";
          LogsDirectory = "open5gs";
          User = "open5gs";
          Group = "open5gs";
          Restart = "always";
          RestartSec = "5";
          RestartPreventExitStatus = "1";
        };
      };
    }) services
  );

  # Create a separate user and group for Open5GS
  users.users.open5gs = {
    group = "open5gs";
    isSystemUser = true;
  };
  users.groups.open5gs = { };

  # Create a TUN interface named ogstun for communication with LTE devices
  systemd.network.netdevs.open5gs = {
    netdevConfig = {
      Kind = "tun";
      Name = "ogstun";
    };
  };

  systemd.network.networks.open5gs = {
    # The IP addresses used here are the same as in the default Open5GS configuration
    address = [
      "10.45.0.1/16"
      "2001:db8:cafe::1/48"
    ];
    linkConfig = {
      MTUBytes = 1400;
      RequiredForOnline = false;
    };
    matchConfig.Name = "ogstun";
  };
}
Creating Open5GS Configuration Files
If you are using Ubuntu, the above installation process should have automatically installed the default configuration files to /etc/freeDiameter and /etc/open5gs. However, in NixOS, this process is not automatic, and we need to manually copy the configuration files or manually specify their paths.
Since the Nixpkgs Open5GS package already comes with a set of default configurations, we can directly copy the default configuration files from this package. First, build the package:
nix build nixpkgs#open5gsIf all goes well, Nix will download the pre-compiled Open5GS from the Binary Cache and symlink it to the result directory. At this point, we can see the default configuration files in the result/etc folder:
ls result/etcThen we can copy them to our NixOS configuration for later modification:
cp -r result/etc/freeDiameter /path/to/your/nixos-config/freeDiameter
cp -r result/etc/open5gs /path/to/your/nixos-config/open5gs
# Files copied from Nix store are read-only by default, add write permissions to them
chmod -R +w /path/to/your/nixos-config/freeDiameter /path/to/your/nixos-config/open5gs
For files in the freeDiameter folder, we need to place them under /etc/freeDiameter:
{
  environment.etc."freeDiameter".source = ./freeDiameter;
}
For files in the open5gs folder, you can directly specify the configuration file path using the -c parameter when starting Open5GS:
{
  systemd.services = {
    # ...
    ExecStart = "${pkgs.open5gs}/bin/open5gs-${svc}d -c ${./open5gs}/${svc}.yaml";
    # ...
  };
}
Not placing them in /etc ensures that Open5GS services will automatically restart after modifying the configuration files.
Fixing Paths in Open5GS Configuration Files under NixOS
Since Open5GS packaged in Nixpkgs is installed by default under a path in /nix/store, its configuration files also references many paths under /nix/store by default.
First, get the actual installation path of Open5GS:
nix build nixpkgs#open5gs --print-out-paths --no-link
# Output similar to:
# /nix/store/vbb0aa2mkjbfay7gdgaw5r23g0ss6kyz-open5gs-v2.7.6/
Then search for this path in the copied configuration files. You will see many places containing the full path:
grep "/nix/store/vbb0aa2mkjbfay7gdgaw5r23g0ss6kyz-open5gs-v2.7.6/" freeDiameter/* open5gs/*
# ...
# Referencing TLS certificates generated by default during Open5GS build
# freeDiameter/hss.conf:TLS_Cred = "/nix/store/vbb0aa2mkjbfay7gdgaw5r23g0ss6kyz-open5gs-v2.7.6/etc/open5gs/tls/hss.crt", "/nix/store/vbb0aa2mkjbfay7gdgaw5r23g0ss6kyz-open5gs-v2.7.6/etc/open5gs/tls/hss.key";
# ...
# Referencing freeDiameter Extension
# freeDiameter/hss.conf:LoadExtension = "/nix/store/vbb0aa2mkjbfay7gdgaw5r23g0ss6kyz-open5gs-v2.7.6/lib/freeDiameter/dbg_msg_dumps.fdx" : "0x8888";
# ...
# Default log path is placed in Nix store
# open5gs/hss.yaml:    path: /nix/store/vbb0aa2mkjbfay7gdgaw5r23g0ss6kyz-open5gs-v2.7.6/var/log/open5gs/hss.log
# ...
# freeDiameter configuration file path is set in Nix store
# open5gs/hss.yaml:  freeDiameter: /nix/store/vbb0aa2mkjbfay7gdgaw5r23g0ss6kyz-open5gs-v2.7.6/etc/freeDiameter/hss.conf
# ...
Once the Open5GS package or its dependencies are updated, the path of Open5GS in the Nix store will change, causing files specified by absolute paths to become invalid, and preventing Open5GS from starting. Therefore, we need to keep these paths synchronized with the Open5GS path, or point them outside the Nix store, to prevent future issues.
My workaround is to first link a copy of the pkgs.open5gs package to /etc:
{
  environment.etc."open5gs-pkg".source = pkgs.open5gs;
}
Then modify the above paths:
# TLS certificates point to /etc/open5gs-pkg. Although this certificate is downloaded from Nixpkgs Binary Cache and the private key can be considered public, we are deploying on a single machine, and communication does not go through external networks, so proper encryption is not necessary.
sed -i "s#/nix/store/vbb0aa2mkjbfay7gdgaw5r23g0ss6kyz-open5gs-v2.7.6/etc/open5gs/tls/#/etc/open5gs-pkg/etc/open5gs/tls/#g" freeDiameter/* open5gs/*
# freeDiameter Extension points to /etc/open5gs-pkg
sed -i "s#/nix/store/vbb0aa2mkjbfay7gdgaw5r23g0ss6kyz-open5gs-v2.7.6/lib/freeDiameter/#/etc/open5gs-pkg/lib/freeDiameter/#g" freeDiameter/* open5gs/*
# Paths in /var point to the actual /var
sed -i "s#/nix/store/vbb0aa2mkjbfay7gdgaw5r23g0ss6kyz-open5gs-v2.7.6/var/#/var/#g" freeDiameter/* open5gs/*
# freeDiameter configuration file points to /etc/freeDiameter
sed -i "s#/nix/store/vbb0aa2mkjbfay7gdgaw5r23g0ss6kyz-open5gs-v2.7.6/etc/freeDiameter/#/etc/freeDiameter/#g" freeDiameter/* open5gs/*
After the modification, we will be able to upgrade Open5GS without issues in the future, and our configuration files placed in /etc will take effect normally.
(Optional) Regenerate Diameter TLS Certificates
Open5GS packaged in Nixpkgs comes with a TLS certificate generated during the build process. If your Open5GS is downloaded from the Binary Cache instead of being compiled locally, you will be using the same TLS key others can download from the Binary Cache.
If you deploy on a single machine according to this tutorial, since all communication is local and does not go through external networks, encryption and private key leakage have little impact on security.
However, if you plan to place some components on other machines, or if you do not want to use this leaked key, you can generate a new one using the following script:
{
  pkgs,
  ...
}:
{
  systemd.services.open5gs-certs = {
    wantedBy = [ "multi-user.target" ];
    path = with pkgs; [ openssl ];
    script = ''
      mkdir -p demoCA
      if [ ! -f "demoCA/serial" ]; then
        echo 01 > demoCA/serial
      fi
      touch demoCA/index.txt

      # CA self certificate
      if [ ! -f "ca.crt" ]; then
        openssl req -new -x509 -days 3650 -newkey rsa:2048 -nodes -keyout ca.key -out ca.crt \
          -subj /CN=ca.epc.mnc010.mcc315.3gppnetwork.org/C=KO/ST=Seoul/O=NeoPlane
      fi

      for i in amf ausf bsf hss mme nrf scp sepp1 sepp2 sepp3 nssf pcf pcrf smf udm udr
      do
        if [ ! -f "$i.crt" ]; then
          openssl genpkey -algorithm rsa -pkeyopt rsa_keygen_bits:2048 \
              -out $i.key
          openssl req -new -key $i.key -out $i.csr \
              -subj /CN=$i.epc.mnc010.mcc315.3gppnetwork.org/C=KO/ST=Seoul/O=NeoPlane
          openssl ca -batch -notext -days 3650 \
              -keyfile ca.key -cert ca.crt \
              -in $i.csr -out $i.crt -outdir .
        fi
      done
    '';
    serviceConfig = {
      Type = "oneshot";
      User = "open5gs";
      Group = "open5gs";
      StateDirectory = "open5gs-certs";
      WorkingDirectory = "/var/lib/open5gs-certs";
    };
  };
}
When you run systemctl start open5gs-certs.service, this service will automatically generate missing keys in /var/lib/open5gs-certs.
Then you can modify the Open5GS configuration file to point the TLS key path to /var/lib/open5gs-certs:
# If you did not replace the TLS key path in the previous step
sed -i "s#/nix/store/vbb0aa2mkjbfay7gdgaw5r23g0ss6kyz-open5gs-v2.7.6/etc/open5gs/tls/#/var/lib/open5gs-certs/#g" freeDiameter/* open5gs/*
# If you have already replaced the TLS key path in the previous step
sed -i "s#/etc/open5gs-pkg/etc/open5gs/tls/#/var/lib/open5gs-certs/#g" freeDiameter/* open5gs/*
You can also add open5gs-certs.service to the After and Requires of each Open5GS systemd service to ensure that the keys are generated before Open5GS starts.
{
  systemd.services = {
    # ...
    after = [
      "network.target"
      "open5gs-certs.service"
      "mongodb.service"
    ];
    requires = [
      "network.target"
      "open5gs-certs.service"
      "mongodb.service"
    ];
    # ...
  };
}
Installing Open5GS Web Management UI
The above steps configured the Open5GS core network itself, but we also need to install the web management UI to manage SIM card related information registered with Open5GS.
If you are using Ubuntu, you can use the official installation script:
# Download Nodesource GPG key
sudo apt update
sudo apt install -y ca-certificates curl gnupg
sudo mkdir -p /etc/apt/keyrings
curl -fsSL https://deb.nodesource.com/gpgkey/nodesource-repo.gpg.key | sudo gpg --dearmor -o /etc/apt/keyrings/nodesource.gpg

# Add NodeJS package repository
NODE_MAJOR=20
echo "deb [signed-by=/etc/apt/keyrings/nodesource.gpg] https://deb.nodesource.com/node_$NODE_MAJOR.x nodistro main" | sudo tee /etc/apt/sources.list.d/nodesource.list

# Install NodeJS
sudo apt update
sudo apt install nodejs -y

# Install Open5GS WebUI
curl -fsSL https://open5gs.org/open5gs/assets/webui/install | sudo -E bash -
If you are using NixOS, you can install it with the following configuration:
{
  pkgs,
  config,
  ...
}:
{
  systemd.services.open5gs-webui = {
    description = "Open5GS WebUI";
    wantedBy = [ "multi-user.target" ];
    after = [
      "network.target"
      "mongodb.service"
    ];
    requires = [
      "network.target"
      "mongodb.service"
    ];
    path = with pkgs; [
      bash
      nodejs
      rsync
    ];
    environment = {
      HOSTNAME = "0.0.0.0";
      PORT = "9999";
    };
    preStart = ''
      export HOME=$(pwd)
      rsync -r --chmod=D755,F755 ${pkgs.open5gs.src}/webui/ .
      npm install
      npm run build
    '';
    serviceConfig = {
      ExecStart = "${pkgs.nodejs}/bin/npm run start";
      CacheDirectory = "open5gs";
      WorkingDirectory = "/var/cache/open5gs";
      User = "open5gs";
      Group = "open5gs";
      Restart = "always";
      RestartSec = "5";
    };
  };
}
Starting Open5GS
Deploy the above configuration to your NixOS machine, and if everything goes well, these services should start normally without issues.
If you are using Ubuntu, all 4G/5G services should have automatically started when you installed the open5gs package. You can disable the 5G SA related services that we don't need, or you can ignore them; they will not affect subsequent configurations.
Creating Default Administrator for Management Panel
Open5GS does not automatically create a default administrator user when it starts, so after the deployment is complete and MongoDB has started, we need to manually run the following command to create an administrator:
cat <<EOF | mongosh open5gs
db = db.getSiblingDB('open5gs')
cursor = db.accounts.find()
if ( cursor.count() == 0 ) {
    db.accounts.insertOne({ salt: 'f5c15fa72622d62b6b790aa8569b9339729801ab8bda5d13997b5db6bfc1d997', hash: '402223057db5194899d2e082aeb0802f6794622e1cbc47529c419e5a603f2cc592074b4f3323b239ffa594c8b756d5c70a4e1f6ecd3f9f0d2d7328c4cf8b1b766514effff0350a90b89e21eac54cd4497a169c0c7554a0e2cd9b672e5414c323f76b8559bc768cba11cad2ea3ae704fb36abc8abc2619231ff84ded60063c6e1554a9777a4a464ef9cfdfa90ecfdacc9844e0e3b2f91b59d9ff024aec4ea1f51b703a31cda9afb1cc2c719a09cee4f9852ba3cf9f07159b1ccf8133924f74df770b1a391c19e8d67ffdcbbef4084a3277e93f55ac60d80338172b2a7b3f29cfe8a36738681794f7ccbe9bc98f8cdeded02f8a4cd0d4b54e1d6ba3d11792ee0ae8801213691848e9c5338e39485816bb0f734b775ac89f454ef90992003511aa8cceed58a3ac2c3814f14afaaed39cbaf4e2719d7213f81665564eec02f60ede838212555873ef742f6666cc66883dcb8281715d5c762fb236d72b770257e7e8d86c122bb69028a34cf1ed93bb973b440fa89a23604cd3fefe85fbd7f55c9b71acf6ad167228c79513f5cfe899a2e2cc498feb6d2d2f07354a17ba74cecfbda3e87d57b147e17dcc7f4c52b802a8e77f28d255a6712dcdc1519e6ac9ec593270bfcf4c395e2531a271a841b1adefb8516a07136b0de47c7fd534601b16f0f7a98f1dbd31795feb97da59e1d23c08461cf37d6f2877d0f2e437f07e25015960f63', username: 'admin', roles: [ 'admin' ], "__v" : 0})
}
EOF
(Source: https://github.com/open5gs/open5gs/blob/main/docs/assets/webui/mongo-init.js)
The above command will create an administrator user with username admin and password 1423.
Open http://[Open5GS machine's IP address]:9999 in your browser, and log in to the management panel with the above username and password.
Modifying Open5GS Configuration Files
After Open5GS is installed, you will need to modify the configuration files to match the parameters of our CBRS LTE network. We only need to make the following changes:
- Change MCC/MNC from the default 999/70 to CBRS's 315/010.
Simply search globally for mcc: 999 and mnc: 70, and replace them with mcc: 315 and mnc: 010 respectively:
sed -i "s#mcc: 999#mcc: 315#g" open5gs/*
sed -i "s#mnc: 70#mnc: 010#g" open5gs/*- Make the MME component listen on
eth0(or your actual network card name) interface instead of127.0.0.2, otherwise the base station cannot connect to the core network.
Modify open5gs/mme.yaml, change the original configuration under s1ap:
mme:
  s1ap:
    server:
      - address: 127.0.0.2
To:
mme:
  s1ap:
    server:
- dev: eth0 # Or your actual network card name- (Optional) Customize the network name broadcast by MME.
Modify open5gs/mme.yaml, find network_name:
network_name:
  full: Open5GS
  short: Next
Change it to your desired network name, for example:
network_name:
  full: Lan Tian Mobile
  short: LTMobile
Finally, restart all Open5GS related services:
systemctl restart open5gs-\*Connecting FreedomFi/Sercomm Base Station to Open5GS
First, please ensure that you can log in to the FreedomFi/Sercomm SCE4255 base station's web management panel via IP address. If you cannot access the base station's web management panel, please refer to the section on enabling the management panel in my previous post.
Disabling TR-069 Remote Management
FreedomFi's Sercomm base stations by default connect to acs.freedomfi.com, a TR-069 server, to automatically obtain configurations. Although this remote management server was shut down when Helium Mobile discontinued its CBRS network, our base station will still continuously try to connect to this server. When using Magma to build the core network, since the Magma core network itself has TR-069 server functionality, we can keep remote management enabled and simply hijack remote management requests to our TR-069 server. However, Open5GS does not have TR-069 functionality, so we need to disable the base station's TR-069 remote management to avoid unnecessary requests, and prevent the base station's configuration from being accidentally overwritten.
Click TR098 at the top of the management interface, then switch to the MgntServer tab to switch to the base station's TR-069 remote management settings page:
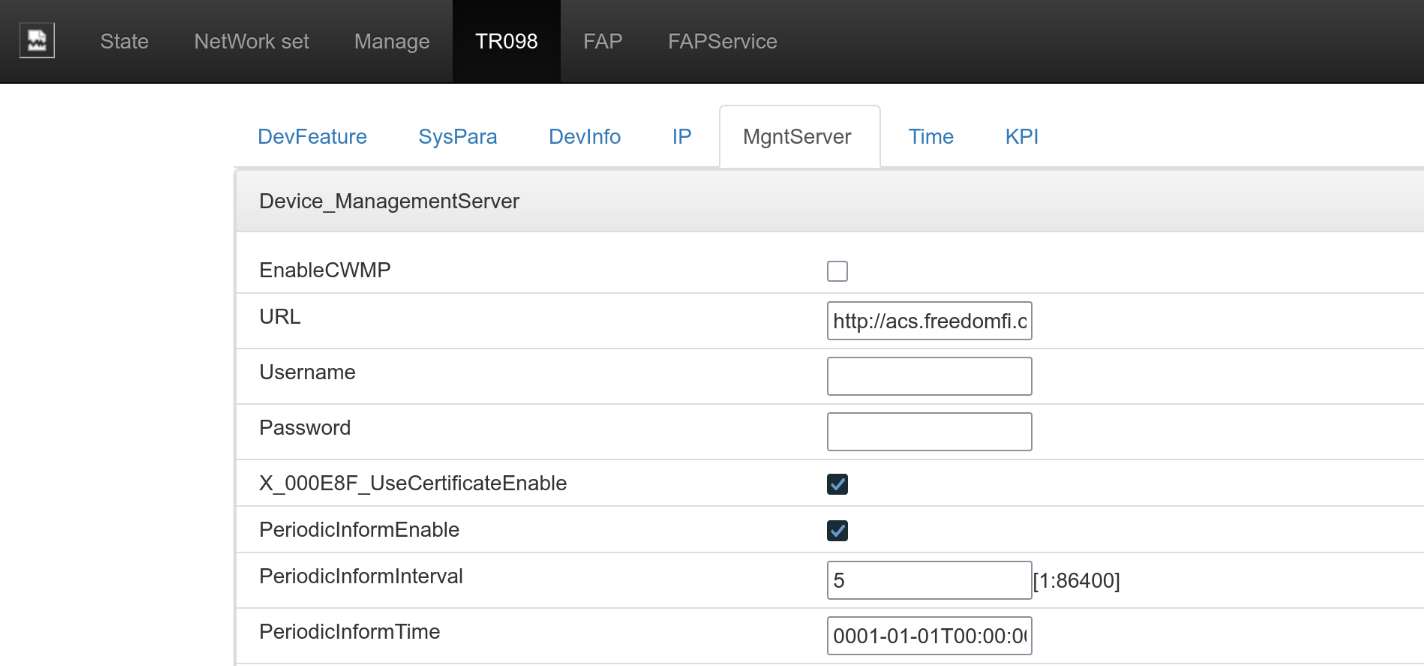
Uncheck EnableCWMP, then click the Save button to save the settings.
Since the Sercomm base station management panel has some bugs, it is recommended to restart the base station here to ensure the settings take effect. The base station may automatically restart when saving settings, but if it does not, you can manually restart it by clicking the power button in the upper right corner of the management interface, or by manually power cycling it. After restarting, please return to this page and ensure EnableCWMP is unchecked.
At this point, the base station's TR-069 remote management function is disabled, and we can modify settings without fear of being overwritten by remote management.
Modifying Base Station CBRS SAS Connection Configuration
The next step is to connect the base station to the CBRS SAS server to obtain spectrum allocation, thereby avoiding conflicts with other base stations or operator signals, and preventing the FCC from SWATting you. When using the Magma core network, the CBRS SAS connection is automatically configured by Magma's TR-069 server, but since Open5GS does not have TR-069 functionality, this needs to be done manually.
First, ensure your base station is registered with the SAS. You can refer to the section on connecting to SAS in my previous post.
Then, click Manage at the top of the base station management interface, then switch to the SAS Configuration tab:
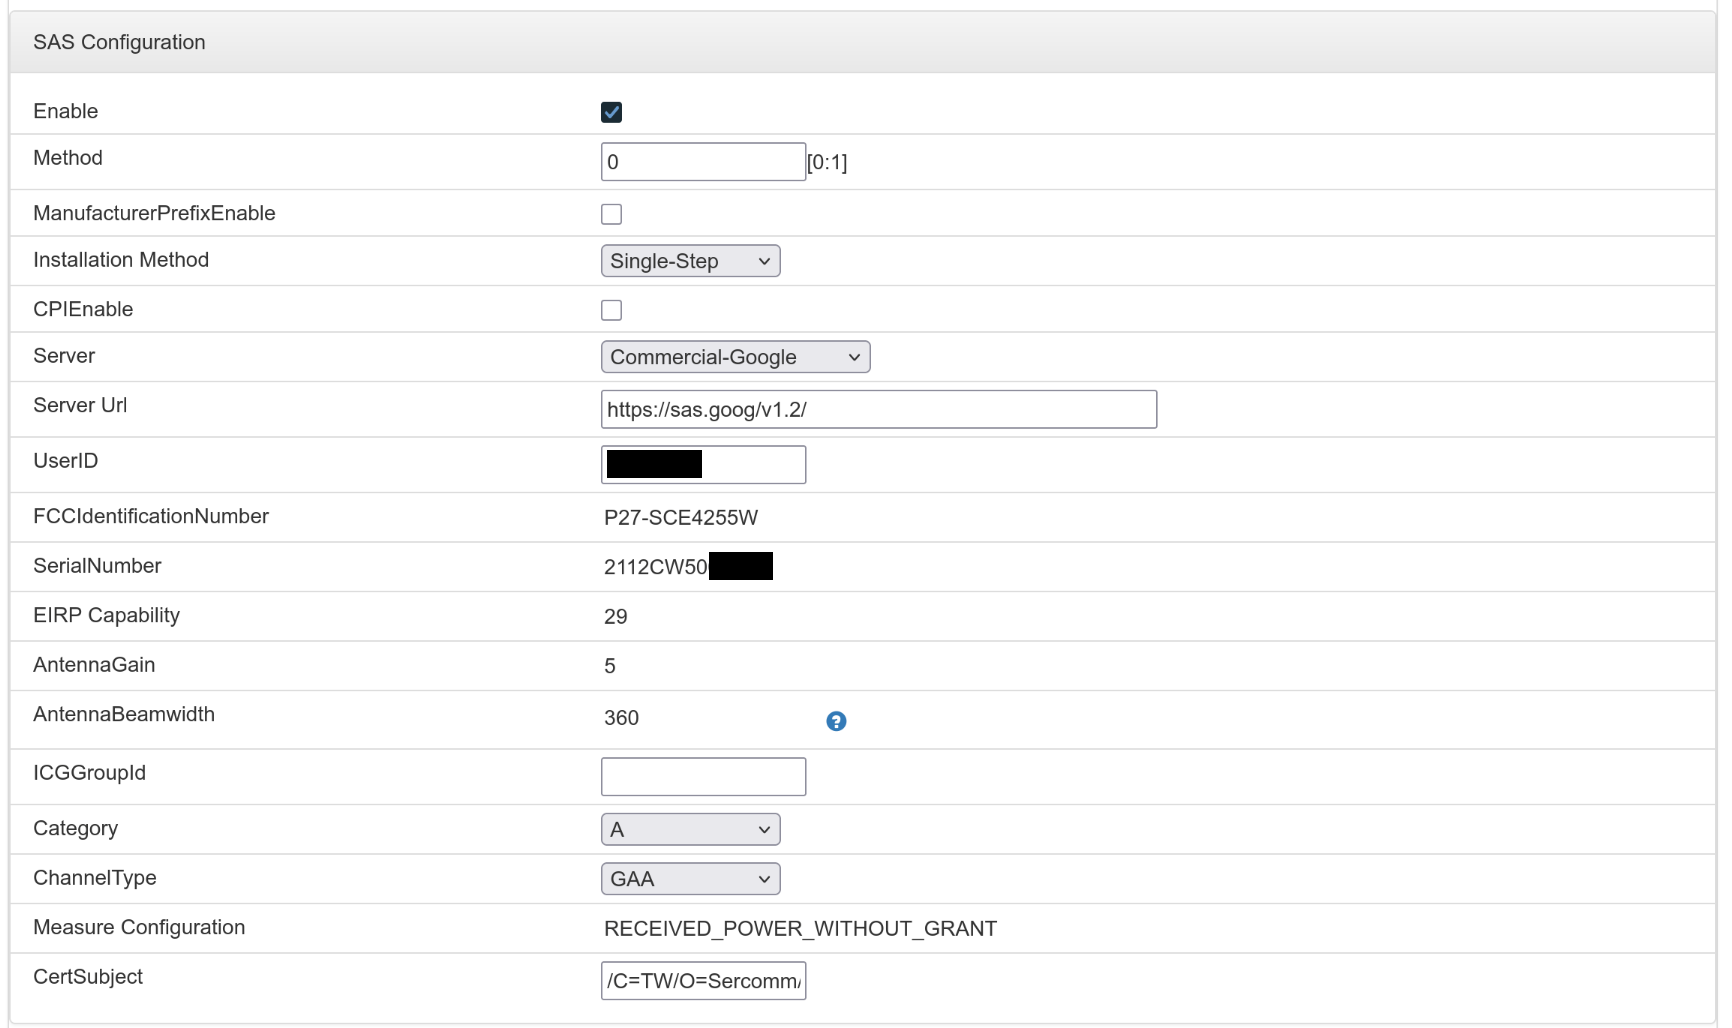
- Check the
Enableoption. - Enter
0for theMethodoption. - Select
Commercial-GoogleforServer, corresponding to Google SAS. At this point,Server Urlshould be automatically populated. - Enter your Google Cloud Project ID for
UserID, which can be found on the console homepage: https://console.cloud.google.com - Select
AforCategory, corresponding to indoor base stations. - Select
GAAforChannelType, corresponding to the lowest priority of the three types of CBRS users. - Enter
/C=TW/O=Sercomm/OU=WInnForum CBSD Certificate/CN=P27-SCE4255W:%sforCertSubject.
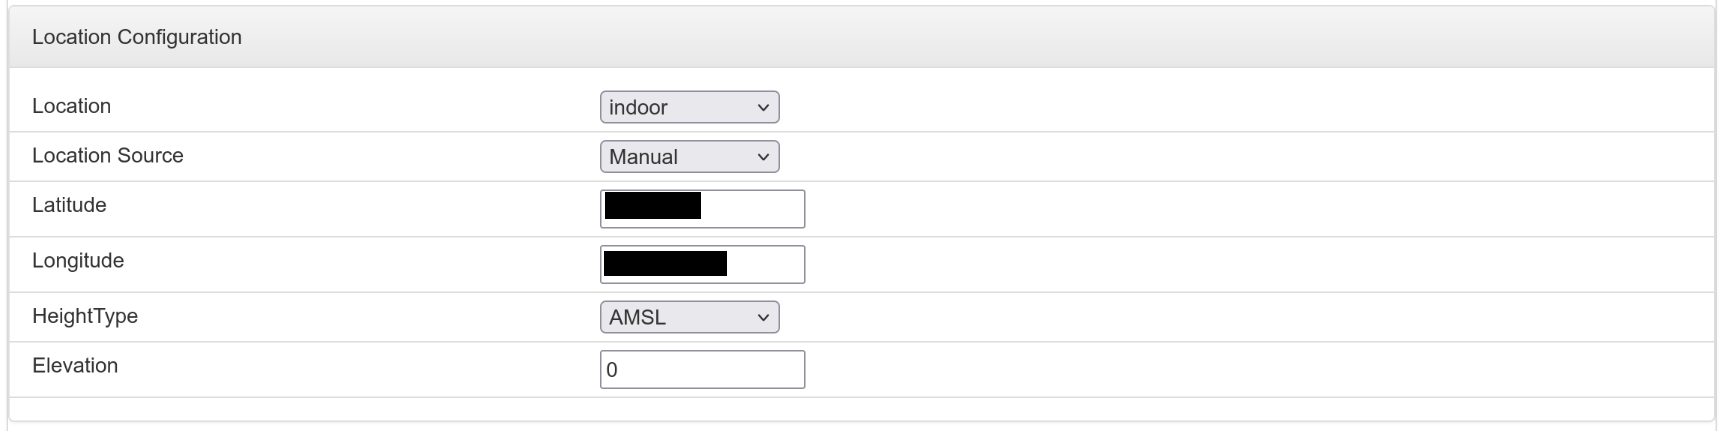
- Select
indoorforLocation, corresponding to indoor deployment. - If your base station's location has good GPS signal,
Location Sourcecan be set toGPS. However, if the GPS signal is poor, the base station will need to wait for GPS positioning to complete before connecting to CBRS SAS and starting to transmit signals after restarting. In this case, you can selectManualand manually enter the base station's latitude and longitude. Latitudeis latitude, with positive values for north of equator, and negative values for south of equator. Note that the unit for Sercomm base station's latitude and longitude is microdegrees (i.e., one millionth of a degree), so if you want to set 40 degrees north of equator, please enter40000000.Longitudeis longitude, with positive values for east of meridian, and negative values for west of meridian. Note that the unit for Sercomm base station's latitude and longitude is microdegrees (i.e., one millionth of a degree), so if you want to set 80 degrees west of meridian, please enter-80000000.- Please obtain the latitude and longitude using your mobile phone or other devices for actual positioning. The base station's location needs to be relatively precise, otherwise it will affect the CBRS SAS spectrum allocation. This latitude and longitude should also be consistent with the latitude and longitude set on the CBRS SAS platform.
- Select
AMSLforHeightType, which means height above mean sea level. - Enter the base station's altitude for
Elevation, in millimeters, so if you want to set 40 meters above sea level, please enter40000.
Save the settings. You don't need to restart the base station yet; you can wait until configuring the base station's connection to the Open5GS core network in the next step.
Modifying Base Station Core Network Connection Configuration
The next step is to connect the base station to the Open5GS core network to transmit user information and data traffic.
Click Manage at the top of the base station management interface, then switch to the LTE Basic Setting tab:
-
Under
Cell Configuration:- Check the
AdminStatsoption, which means enabling signal transmission. - Select
1forCarrier Number.- If you select
2and adjust the settings below accordingly, you can enable carrier aggregation to double the bandwidth, but Sercomm's CBRS SAS implementation has some issues that may randomly cause signal transmission interruptions.
- If you select
- Do not check the
Carrier Aggregationoption.- If you want to enable carrier aggregation, check this box.
- Select
20forBandWidthto maximize bandwidth for highest speed. - Enter
0forCellIDentity. If you have multiple base stations, you can enter1,2, etc., sequentially, ensuring no duplication between base stations.- If you want to enable carrier aggregation, enter
0,1, which means two different IDs separated by a comma.
- If you want to enable carrier aggregation, enter
- Enter
100forPCI. If you have multiple base stations, you can enter101,102, etc., sequentially, ensuring no duplication between base stations.- If you want to enable carrier aggregation, enter
100,101, which means two different IDs separated by a comma.
- If you want to enable carrier aggregation, enter
- Enter
24forTxPower.
- Check the
-
Under
S1 Configuration:- Select IPv4 for
Tunnel Type. At this point, data between the base station and the core network is transmitted in plain text.- Since our base station and core network are on the same local area network and are physically controlled by us, the security risk here is small. However, if your base station needs to connect to the core network over Internet, you should try using the
IPSECoption, but you will need to additionally configure IPSec tunnel related settings.
- Since our base station and core network are on the same local area network and are physically controlled by us, the security risk here is small. However, if your base station needs to connect to the core network over Internet, you should try using the
- Enter the IP address of the
Open5GScore network machine forMME IP Address.- If different components of your
Open5GScore network are installed on different machines, enter the IP address of the machine running the MME component here.
- If different components of your
- Enter
315010forPLMNID, corresponding to CBRS's MCC/MNC. - Enter
1forTAC.
- Select IPv4 for
-
If your base station's location has good GPS signal,
Sync Sourcecan be set toGPS. However, if the GPS signal is poor, the base station will need to wait for GPS positioning to complete before starting to transmit signals after restarting. In this case, you can selectFREE_RUNNING.
Save the settings. It is recommended to restart the base station once here to ensure the settings take effect. The base station may automatically restart when saving settings, but if it does not, you can manually restart it by clicking the power button in the upper right corner of the management interface, or by manually power cycling it.
After restarting, wait a moment and check the base station's indicator lights; the leftmost LTE status indicator light should be a steady blue, indicating that it's now transmitting LTE signals. This completes the base station configuration.
Take out your phone, select any SIM card, turn off the "Automatic Network Selection" option, and the phone will automatically search for nearby mobile networks. If your phone supports LTE band 48, you should see a network named Lan Tian Mobile (or your own configured network name), which is the signal transmitted by your base station.
The base station management panel should also display henb running, indicating that the base station is running normally:

Registering SIM Card Information with Open5GS
After the core network and base station are running normally, you can register SIM cards with the core network to allow phones and other devices using these SIM cards to connect to the LTE network.
Prepare a few programmable SIM cards and program authentication information to your SIM cards according to the SIM card programming tutorial in the previous post. Record the SIM card's IMSI/KI/OPC information.
Log in to Open5GS's web management panel, then click Add a subscriber:
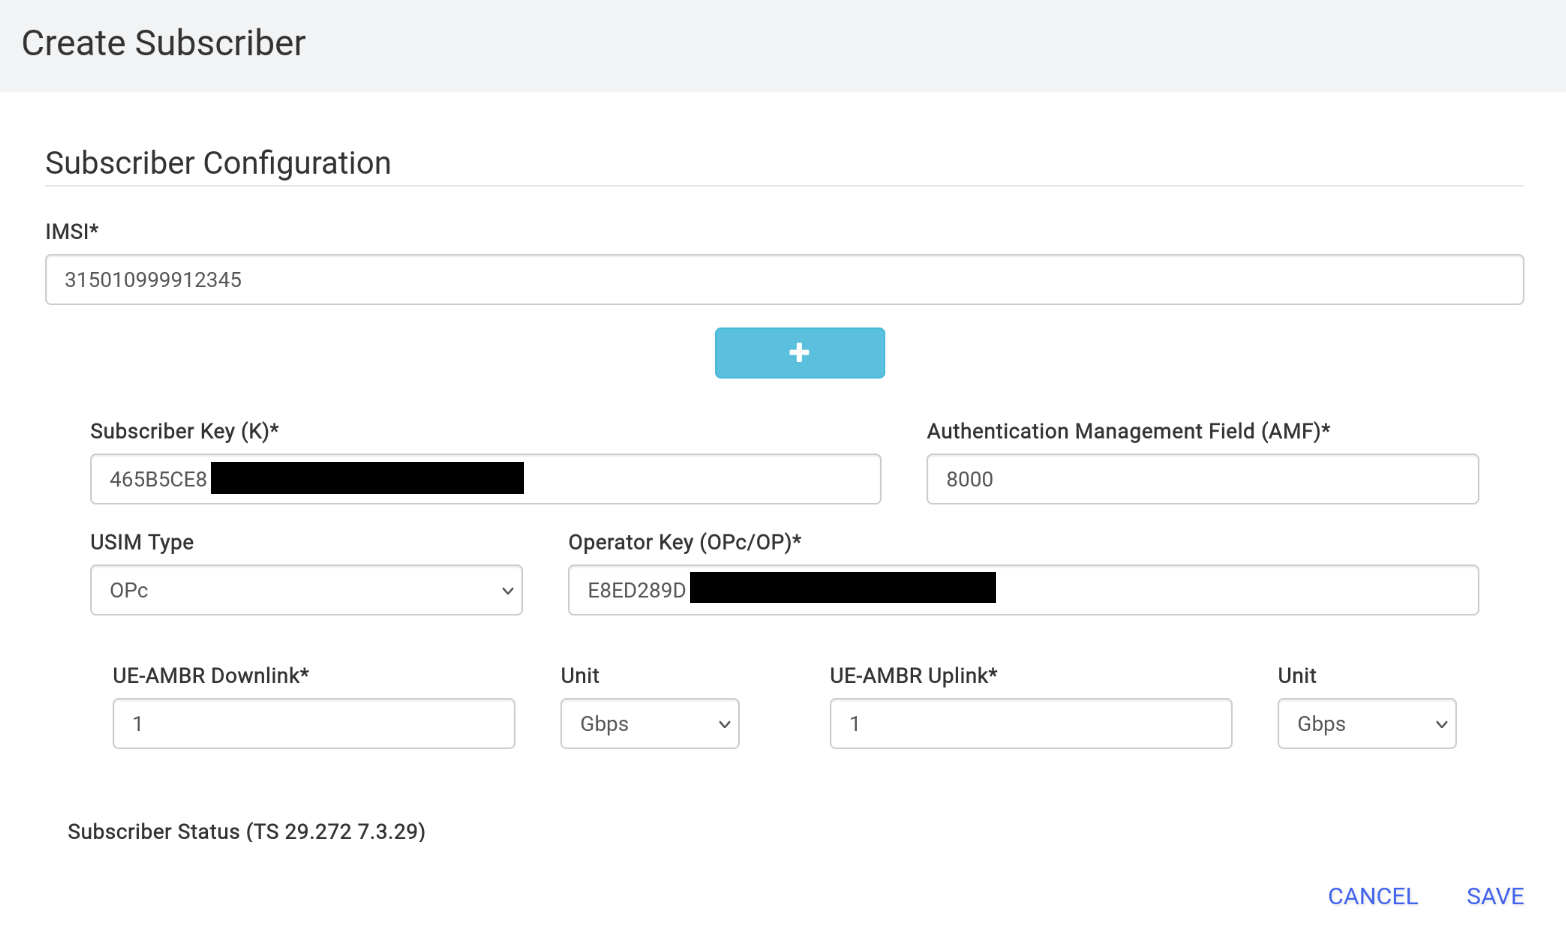
- Enter the SIM card's corresponding IMSI information for
IMSI. - Enter the SIM card's
KIforSubscriber Key. - Enter the SIM card's
OPCforOperator Key.
Keep all other options at their defaults and click Save.
Insert the SIM card into your phone, wait a moment, and your phone should be able to connect to your mobile network.
Summary
This post mainly records the steps that differ from the Magma core network when setting up Open5GS, as well as some issues specific to setting it up on NixOS. Compared to Magma, Open5GS has a simpler installation process and does not rely on containerization management tools like Docker. If you are using Ubuntu, most of the above process is actually automatically completed during apt install.
From the perspective of LTE terminal devices (e.g., mobile phones), there is no difference in using these two core network software. Both have similar latency and network bandwidth, mainly limited by LTE communication itself. (Except for the strange bug I encountered with Magma where Android phones could not authenticate properly.)
I switched to Open5GS for the management convenience mentioned at the beginning. You can choose either Open5GS or Magma based on your preference.